Contents
Old-school, manual crank-down windows are a pain. It’s especially bad when you have to contort yourself to reach a crank-handle in the back row. Thankfully, power window conversions are easy.
When you finish the conversion, it becomes an absolute pleasure to open and close the window with the press of a button. Welcome to the 21st century.
Also see: “Power Window Motor Repair”
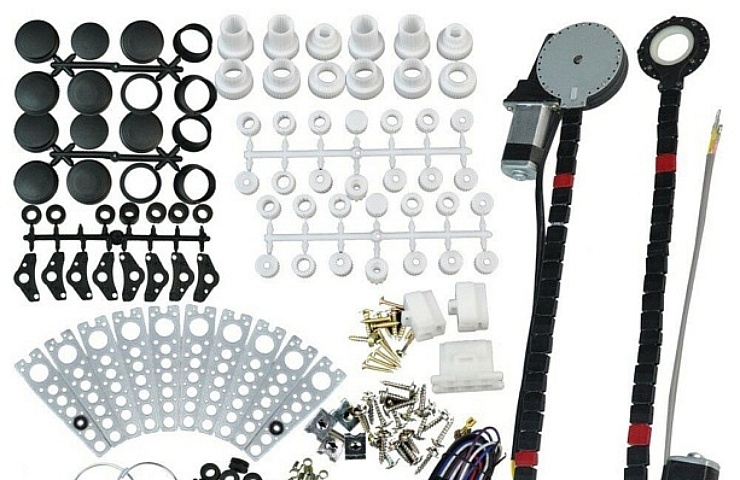
Power Window Conversion Kit Types
You should expect to spend about four hours per window. Kits for power window conversions come in two flavors:
One size fits all
These kits provide a variety of adapters and covers that are suitable for nearly every vehicle. These tend to be less expensive. That’s because vendors don’t need to stock as many different kits.
One-size-fits-all kits for power window conversions use the same parts for more than one vehicle. If you have a unique car, a one-size-fits-all kit might be your only choice.
Model-specific
These packages offer the parts required for your specific make and model. A specific kit takes the guesswork out of the process. The directions are distinct.
Also, many make-specific kits replace the regulator with a new one that’s provided. The new one has an attached motor that utilizes the same mounting holes as the manual regulator.

Motor and cable
How a Manual Window Works
Let’s start with a basic overview of how a car window works.
A standard window regulator has a series of scissored metal supports linked by geared or toothed pieces. When the window crank is rotated, the attached rod moves the scissored pieces up and down.
This video provides a great view of the mechanism.

Kits for power window conversions use an adapter with teeth (or splines) that attach to that spindle. (Splines are ridges or teeth on a drive shaft that mesh with grooves.)
A motor then moves a cable attached to that splined adapter to slide the window up and down.
The Steps for the Power Window Conversions
The following steps will work for nearly all cars and trucks. The instructions are based on a one-size-fits-all kit. Model-specific kits will provide any steps that are unique to your vehicle.
This video provides a nice run-through of the process.
It helps to have enough workspace to fully open your car door—and an extra two feet of space to move around.
Remove the door panel
To gain access to the window regulator, you have to remove the door panel. The window crank is attached to the spindle using a C-shaped clip. Use a door/window handle remover tool to push off the clip and remove the crank from the splined shaft.
Next, remove the other retainers that hold the panel in place. In older cars, that usually requires removing some screws. In modern vehicles, the screws are hidden behind plastic plugs or access panels. The edges are held in place with plastic clips.
We recommend using a plastic door-panel trim removal tool. You can also use a screwdriver covered with tape to remove the clips. Start at one end and work around the perimeter. The door panel should come off with one or two gentle tugs up and out.
The hardest part of the process is ensuring that the clips and screws are undone.
Gain access
Once the door panel is gone, you should see a plastic piece covering the door openings. Gently remove the plastic, which serves as weatherproofing.
You will see that the door panel has a large cavity and various cutouts in the panel. Removing the speaker could give you more access to the window parts.
Put in the adapter

Spline adapters
The shaft that rotates to raise and lower the window has splines (ridges or teeth). The window crank-handles fit into those splines.
Identify which of the kit’s adapters fits those splines. The kit has a cable with a large circular piece that fits over that adapter. The other end of the line is usually already attached to the electric motor.
Find the location where the motor fits inside the door cavity. The kit’s metal-supports should attach the motor to existing screw holes within the interior sheet metal.
The support braces will have a staggered series of holes that you can choose from until the holes align with existing holes in the sheet metal.
Now screw down the motor brackets and adapters loosely and check for fit and alignment. When everything lines up, tighten down all the screws or bolts.
Connect the wires
Disconnect your car battery before you start poking around.
A good kit for a power window conversion should have a harness for each door. The harness will have an adapter with two connections: one to the motor and another to the door switch.
The rest of the wires will run out of the door and into the passenger compartment through the kick panel. (If you are sitting on the left side of the car, kick your foot to the left. You just hit the left kick panel.)
Test the wiring
Before continuing with the wiring steps, temporarily power your harness to a 12-volt source and test the window to ensure it is working correctly. Sometimes, the switch’s wires might get swapped, and the down button moves the window up instead of down.
This is also an excellent time to check that nothing is binding between the motor and the cable.
Most cars have a rubber tube or a flexible conduit/loom that passes stereo speaker wires and other wiring through the door jamb and into the kick panel area. If the car doesn’t have a loom (or wire conduit that the wires pass through), the kit should have one that you can install after drilling holes into the door frame and panel.
Warning: Do not run bare wire through the gap in the door. Eventually the wires will break or the insulation will rub off. That could create a short circuit or even a fire.
Remove the kick panel. There should be enough room to pass the wiring harness through the tube and into the passenger compartment. From there, snake the wiring under the dash to the interior fuse panel. Some kits use a relay to connect all the wiring for the harness.
Add a fuse
You will probably need a 20-30 amp circuit to power the windows, especially if you plan to activate more than one window at a time.
You will want a circuit that is only powered when the car is running (switched). This will prevent a thief from slipping a stiff wire or prod through the weather stripping to reach the switches.
Most kits advise that you connect each window to the main harness and have that one harness get power from the fuse box.
If you are lucky, the fuse box has an unused circuit slot that can be employed for the power windows. If not, you can use add-on fuse product for an additional circuit.
A “tap a fuse” is a wiring device that replaces an existing factory fuse. It also adds a new one (a tap) for additional power needs.

Tap a fuse
Warning: Do not power the windows without a fuse. Every power circuit in your car needs a fuse to avoid allowing excess power. Without a proper fuse, the wiring could overheat or cause a shutdown.
Add the switch

Door switch
Most power window conversion kits have a plastic case or well that screws into the door panel from the back. The switch fits into that well. Or the switch will be a flat panel that goes directly onto the door panel and is held in place with prongs.
Hopefully, the switch will go over the existing hole for the window crank and not impede the new adapter’s movement.
You might need to enlarge the existing hole slightly to pass the wiring harness to the switch. If you cannot place the switch over the existing crank hole for some reason, most kits for power window conversions have a circular cover that will fit over the hole to cover it.
It might not look perfect, but it shouldn’t look terrible. And the new electric function will make up for any compromises on aesthetics.
Repeat for the remaining windows
After figuring out how to convert to power for the first window, the others will be easier.
We recommend leaving the driver’s door for last. Typically, the driver’s door will provide a connection and switch to operate all windows in the vehicle. If you install a window motor and it doesn’t perform as expected, check for the wiring connections and any binding.
You need to check that nothing is preventing the motor from turning, the cable from moving, or the window from sliding free in its track.
Wrap up the power window conversion
After all four windows are working as expected, you can zip-tie any loose hanging wires. The idea is to have a tidy finished look to the job.
Replace the plastic cover and then the door panels, start the car, and test the windows one more time.
After you confirm that they work, take your car for a spin. And enjoy the experience of seeing the windows roll up and down during your breezy cruise down the road.
Shop power-window kitsSee Power Window Kit for sale on eBay.