
The motor and cables were easy to replace.
Replacing your own power window motor might sound scary. But anyone with a few basic tools can complete the DIY repair project.
If you have manual hand-crank windows and want to convert them to power windows, see this article: “A Guide to Power Window Conversions.”
The first power windows came out in luxury automobiles in 1940. Electric windows have been standard equipment in most new cars for more than 10 years.
While power windows are convenient and easy to operate, they are subject to failure. For example, I recently started hearing a clunking sound when using the right-side passenger window. At the same time, the power window motor kept getting slower.
How did I know that it was finally time for power window motor repair? To get the window up, I had to manually pull the glass up while pressing the button.
Check These Items Before Replacing the Motor
Before replacing the motor, check these items:
- Make sure the fuse for that circuit is good. Replacing a dead fuse could get the job done.
- The motor might have locked up (or seized). Just one solid strike with a rubber mallet will either free it up or let you know you need a replacement window motor.
- Check the linkages to see if they need lubrication. The scissor-lift mechanism has several pivoting pieces of metal. Spray some WD-40 or apply white lithium grease to lubricate the trouble spots. Test and see if the grease allows the window to move again.
If you rule out those issues and the window still moves slowly or makes loud noises, it’s probably time for a power window repair job.
Getting Access to the Motor
Every car uses a little different design for its power window. But the basic approach is the same. I’m illustrating the process with a 2003 Corvette.
Find Your Replacement Parts
Check out eBay Motors for a full range of replacement parts. Some folks buy a generic, one-size-fits-all replacement motor. However, I chose a Delco factory replacement window motor.
A power window motor repair is a matter of disconnecting basic electrical connections. You might feel safer disconnecting the battery during this process. I kept the battery intact.
Steps
Here’s a description of what you need to do remove the door panel and replace the motor. Check out this YouTube video that guides you through the process. And I provide step-by-step instructions below.

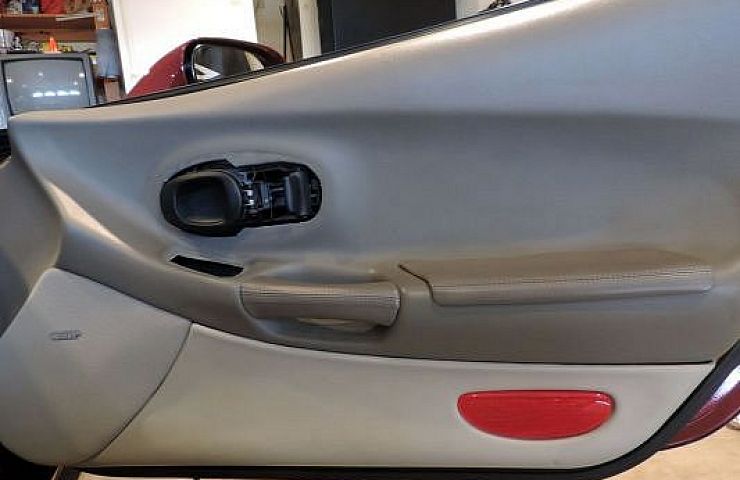
- Remove the interior door panel (as shown in the photo at the top of this page)
- Pry off cover plugs and lift up parts to access the retaining bolts
- Pry out a few plastic pins used to hold the panel securely on the door perimeter

I removed two bolts from behind the door handle.
I had to pop off a bezel around the door handle. Next, I had to lift out the window button panel. After that, I removed two bolts hiding behind two plastic plugs.
Finally, pry out the door panel from the plastic pins. The panel should lift right off.

With the door panel removed, you can gain access to the motor.
This exposes the guts of the door panel. Peel off any plastic black film if it’s in the way of the parts.
I also removed the radio speaker on the left side to get easier access to the motor. The window glass is clamped between a set of metal pieces.

Here you can see one of the glass attachment points.
Take note of where the glass sits by using a grease marker or a piece of tape to show the glass placement before you remove the glass. Loosen the bolts and gently lift out the glass.
Complete the Power Window Motor Repair
Now you are ready to remove the motor and related cables. The photo below shows an attachment bolt next to the green edge of the cable.

This photo shows one of the motor-cable attachments.
For this car, there is a bolt-on on the bottom of the door frame. Remove the bolts, disconnect the electric connector, wiggling the cables and motor out of the door panel.
Install the New Motor
At this stage, reverse the steps and install the new motor. In my case, I found that the factory replacement was correct. Yet, Chevrolet at some point had changed the electrical connectors. As a result, I had to buy the new correct connectors and splice them in.

The correct adapter for the electric connection and two butt connectors were needed for the repair.
Put the Glass Window Back
Once the motor and cable are in place and firmly bolted back in place, return the glass window into position. Use the past location as a guide.
Test the Operation
Gently bolt down the pieces to hold the glass. At this point, it’s important to test the operation. Also, make sure the window fits in the frame and correctly closes up on the weather-stripping. If gaps exist, loosen those bolts and shift the window gently so that it seals tight.

I spliced the new wiring connector into the circuit.
Cover Everything Else Up
Then I replaced the plastic film and speakers making sure everything was back in place. I returned the interior door panel, pushed the pins back in, replaced the bolts, and covered everything back up.
This Repair Saves You Money
Not only did I save the labor part of the bill, but I also saved some cash on the list price of the replacement motor. You can do the same. And of course, there’s the satisfaction of making the power window repair yourself.